Due: 09/23/22 #
FAQ #
Each assignment will have an FAQ linked at the top. You can also access it by adding “/faq” to the end of the URL. The FAQ for Project 1 is located here.
Introduction #
In Project 1, we will build implementations of a “Double Ended Queue” using both lists and arrays in a package that other classes can use. The project is roughly split into two halves: the data structure portion and the application portion.
In the data structure part of the project, you will create two Java files:
LinkedListDeque.java and ArrayDeque.java, with public methods listed below. You will be verifying the correctness of
these data structures yourself using the randomized and timing test skills you gained from Lab 3.
In the application part of this project, you’ll create a Java file
MaxArrayDeque.java as well as use your package to ultimately implement a sound synthesizer capable of playing music
from Guitar Hero. You must test your MaxArrayDeque, but we’ll provide the tests for sound synthesizer.
Check out the project 1 slides for some additional visually oriented tips.
We will provide relatively little scaffolding. In other words, we’ll say what you should do, but not how.
For this project, you must work alone! Please carefully read the Policy on Collaboration and Cheating to see what this means exactly.
Additionally, we will be enforcing style. You must follow the style guide (coming soon) or you will lose points on the autograder.
Getting the Skeleton Files #
As with Project 0, you should start by downloading the skeleton files.
To do this, head to the folder containing your copy of your repository. For example, if your login is s101, then head
to the `fa22-s101 folder (or any subdirectory).
To make sure you have the latest copy of the skeleton files, use the command:
git pull skeleton main
You should now see a proj1 directory appear in your repo with two folders:
 proj1
├── deque
│   └── LinkedListDequeTest.java
└── gh2
    ├── GuitarHeroLite.java
    ├── GuitarPlayer.java
    ├── GuitarString.java
    ├── TTFAF.java
    └── TestGuitarString.java
If you get some sort of error, STOP and either figure it out by carefully reading the git guide linked on the course
website or seek help at OH or Ed. You’ll potentially save yourself a lot of trouble vs. guess-and-check with git
commands. If you find yourself trying to use commands recommended by Google like
force push,
don’t.
Don’t use force push, even if a post you found on Stack Overflow says to do it!
The only provided files in the skeleton are the deque/LinkedListDequeTest.java
file as well as some skeleton for the second part of this project located in the gh2 folder (guitar hero 2).
The deque/LinkedListDequeTest.java file provides examples of how you might write tests to verify the correctness of
your code. We strongly encourage you try out the given tests, as well as to write your own, as these tests
are not comprehensive.
The tests in this file are also the exact tests that will be used in the checkpoint to assess your progress on
your LinkedListDeque implementation, but we will also have additional tests for ArrayDeque that we do not give you.
More details on the checkpoints appear later in the spec.
Before we get into the details of the Deque API and the implementation requirements, let’s briefly talk about packages and why we are using them in this project.
Packages #
Part of this project is using packages to separate logic and functionality. At the end of the project, you’ll have two
packages: the deque package that provides an implementation of the Deque data structure, and the gh2 package that
implements a synthesizer used to play guitar hero. You should already see folders with these names in the starter code,
and your job is to implement them. Let’s look at the specifics for what a package really is.
A package is a collection of Java classes that all work together towards some common goal. We’ve already seen packages
in CS 61B without knowing it. For example,
org.junit is a package that contains various classes useful for testing, including our familiar Assert class, which
contains useful static methods like
assertEquals. In other words, when we saw org.junit.Assert.assertEquals, the
org.junit was the package name, Assert was the class name, and
assertEquals was the method name. We call org.junit.Assert.assertEquals the
“canonical name” of the method, and we call assertEquals the “simple name” of the method.
When creating a package, we specify that code is part of a package by specifying the package name at the top of the file
using the package keyword. For example, if we wanted to declare that a file is part of the deque
package, we’d add the following line to the top of the file.
package deque;
If a programmer wanted to use a class or method from our
deque package, they would have to either use the full canonical name, e.g. deque.ArrayDeque, or alternately
use import deque.ArrayDeque, at which point they could just use the simple name ArrayDeque. So import statements
just allow you to use the simple name of a class/method.
Typically, package names are the internet address of the entity writing the code, but backwards. For example, the JUnit
library is hosted at junit.org, so the package is called org.junit.
Why are packages useful? It all boils down to that word “canonical”. As long as no two programmers use the same package
name for their package, we can freely use the same class name in several different contexts. For example, there might
exist a class called com.hrblock.TaxCalculator, which is different from
com.turbotax.TaxCalculator. Given the requirement to either use the full canonical name or to use an import, this
means we’ll never accidentally use one class when we meant to use the other.
Conceptually, you can think of packages as being similar to different folders on your computer. When you are building a large system, it is a good idea to organize it into different packages.
From this point forwards, most of our code in CS 61B will be part of a package.
Grading Details #
The entire project is due on Friday 09/23. To keep you on track we have two additional graders released on Gradescope, 1a and 1b. These graders do not test the full functionality of LinkedListDeque or ArrayDeque, but test some basic functionalities. These graders are not graded at all.
With that out of the way, let’s talk about the methods that a Deque should have.
The Deque API #
The double ended queue is very similar to the SLList and AList classes that we’ve discussed in class. Here is a definition from cplusplus.com.
Deque (usually pronounced like “deck”) is an irregular acronym of double-ended queue. Double-ended queues are sequence containers with dynamic sizes that can be expanded or contracted on both ends (either its front or its back).
Specifically, any deque implementation must have exactly the following operations:
public void addFirst(T item): Adds an item of typeTto the front of the deque. You can assume thatitemis nevernull.public void addLast(T item): Adds an item of typeTto the back of the deque. You can assume thatitemis nevernull.public boolean isEmpty(): Returnstrueif deque is empty,falseotherwise.public int size(): Returns the number of items in the deque.public void printDeque(): Prints the items in the deque from first to last, separated by a space. Once all the items have been printed, print out a new line.public T removeFirst(): Removes and returns the item at the front of the deque. If no such item exists, returnsnull.public T removeLast(): Removes and returns the item at the back of the deque. If no such item exists, returnsnull.public T get(int index): Gets the item at the given index, where 0 is the front, 1 is the next item, and so forth. If no such item exists, returnsnull. Must not alter the deque!
In addition, we also want our two deques to implement these two special methods:
public Iterator<T> iterator(): The deques objects we’ll make are iterable (i.e.Iterable<T>) so we must provide this method to return an iterator.public boolean equals(Object o): Returns whether or not the parameterois equal to the deque.ois considered equal if it is a deque and if it contains the same contents (as determined by the genericT’sequalsmethod) in the same order. (You’ll need to use theinstance ofkeywords for this. Read here for more information)
You should not have your Deque interface implement Iterable; instead the two implementations LinkedListDeque
and ArrayDeque
should implement Iterable in Project 1c. If you do the former, or if you implement Iterable in 1a or 1b, our
autograder will give you API errors. We know this is less than optimal, but it’s a constraint of the grader.
Additionally, you’ll learn what an Iterator is in Lecture 11 (09/19), so don’t worry about it right now. In fact,
don’t do it until the Project 1c grader, or your code will receive an API penalty. (We know that this doesn’t make
sense, but it’s difficult to fix.)
This project is meant to be done little by little as you learn more things from lecture and discussion, and it’s a
fantastic opportunity to practice all the things you learn in this course.
Your class should accept any generic type (not just integers). For information on creating and using generic data structures, see lecture 5. Make sure to pay close attention to the rules of thumb on the slides about generics.
In this project, you will provide two implementations for the Deque interface: one powered by a Linked List, and one by a resizing array.
Project Tasks #
1. Linked List Deque #
This section of the spec describes the Project 1a autograder.
Create a file called LinkedListDeque.java in your proj1/deque directory. Make sure you declare that it is in
the deque package using the special package
keyword.
As your first deque implementation, you’ll build the LinkedListDeque class, which will be Linked List based.
For this class, you’ll need to implement the following methods (see “The Deque API” above for descriptions of the first 10 methods):
public void addFirst(T item)public void addLast(T item)public boolean isEmpty()public int size()public void printDeque()public T removeFirst()public T removeLast()public T get(int index)public boolean equals(Object o)public LinkedListDeque(): Creates an empty linked list deque.public T getRecursive(int index): Same as get, but uses recursion.
You may add any private helper classes or methods in LinkedListDeque.java if you deem it necessary. If you do, please
add helpful Javadoc comments for your and your TAs sake.
Your operations are subject to the following rules:
addandremoveoperations must not involve any looping or recursion. A single such operation must take “constant time”, i.e. execution time should not depend on the size of the deque. This means that you cannot use loops that go over all/most elements of the deque.getmust use iteration, not recursion.sizemust take constant time.- Iterating over the
LinkedListDequeusing a for-each loop should take time proportional to the number of items. - Do not maintain references to items that are no longer in the deque. The amount of memory that your program uses at any given time must be proportional to the number of items. For example, if you add 10,000 items to the deque, and then remove 9,999 items, the resulting memory usage should amount to a deque with 1 item, and not 10,000. Remember that the Java garbage collector will “delete” things for us if and only if there are no pointers to that object.
There are many design issues to consider in this part of the project, and you may find the implementation more challenging than you’d expect.
Make sure to consult the lecture on doubly linked lists, particularly the slides on sentinel nodes: two sentinel topology, and circular sentinel topology. I prefer the circular approach.
You are not allowed to use Java’s built in
LinkedList data structure (or any data structure from java.util.*) in your implementation and the autograder will
instantly give you a 0 if we detect that you’ve imported any such data structure. The exceptions are Iterator,
Iterable, and Comparator.
2. Array Deque #
This section of the spec describes the Project 1b autograder.
Create a file called ArrayDeque.java in your proj1/deque directory. Again, use the package keyword to tell this
file that it is part of the deque
package.
As your second deque implementation, you’ll build the ArrayDeque class. This deque must use arrays as the core data
structure.
For this class, you’ll need to implement the following methods (see “The Deque API” above for descriptions of the first 10 methods):
public void addFirst(T item)public void addLast(T item)public boolean isEmpty()public int size()public void printDeque()public T removeFirst()public T removeLast()public T get(int index)public boolean equals(Object o)public ArrayDeque(): Creates an empty array deque.
You may add any private helper classes or methods in ArrayDeque.java if you deem it necessary.
For this implementation, your operations are subject to the following rules:
addandremovemust take constant time, except during resizing operations.getandsizemust take constant time.- The starting size of your array should be 8.
- The amount of memory that your program uses at any given time must be proportional to the number of items. For example, if you add 10,000 items to the deque, and then remove 9,999 items, you shouldn’t still be using an array of length 10,000ish. For arrays of length 16 or more, your usage factor should always be at least 25%. This means that before performing a remove operation that will bring the number of elements in the array under 25% the length of the array, you should resize the size of the array down. For arrays under length 16, your usage factor can be arbitrarily low.
You will need to somehow keep track of what array indices hold the Deque’s front and back elements. We strongly
recommend that you treat your array as circular for this exercise. In other words, if your front item is at position
zero, and you
addFirst, the new front should loop back around to the end of the array
(so the new front item in the deque will be the last item in the underlying array). This will result in far fewer
headaches than non-circular approaches.
See the project 1 demo slides for more details.
Correctly resizing your array is very tricky, and will require some deep thought. Try drawing out various approaches by hand. It may take you quite some time to come up with the right approach, and we encourage you to debate the big ideas with your fellow students or TAs. Make sure that your actual implementation is by you alone.
Testing #
Testing is an important part of code writing in industry and academia. It is an essential skill that can prevent monetary loss and hazardous bugs in industry, or in your case, losing points. Learning how to write good, comprehensive unit tests, and developing a good habit of always testing code before shipping are some core objectives of CS 61B.
In the starter code, we have provided you a very simple sanity check,
LinkedListDequeTest.java. To use the sample testing file, you must uncomment the lines in the sample tests. Only
uncomment a test once you have implemented all of the methods used by that test (otherwise it won’t compile). Execute
the main method to run the tests. When testing your project, remember you can use the visualizer from inside
IntelliJ!
You will not submit LinkedListDequeTest.java. It is for your benefit to write more comprehensive tests for
both LinkedListDeque and ArrayDeque before submitting. Note, passing the given tests in LinkedListDequeTest.java
does
not necessarily mean that you will pass all of the autograder tests or receive full credit on the full autograder.
If you create tests for ArrayDeque, please name the file
ArrayDequeTest.java, so that the autograder doesn’t style-check it.
Because the part of the goals for this project is for you to build something and assess the correctness by yourself, we do not want you to become to reliant on the full autograder to verify correctness. Thus, we have a restrictive autograder “token” system in place that will limit the number of submissions you can make to the various autograders for this assignment. For more details, see the “Submission and Scoring” section of the spec.
So how do you verify correctness of your data structure? You use your skills that you got from Lab 3! You are encouraged
to copy and paste those tests for
SList and AList and adapt them for these data structures. The tests will look very similar and only require basic
changes.
While it does seem very daunting and scary to do an entire project with very minimal access to the autograder, you should feel very confident in your implementation if your randomized tests are really big. With just a few lines of code, you could test your data structures with sizes in the 100,000’s and all sorts of random method calls in random order. In other words, you are testing a whole lot of cases on your data structures and are likely testing every possible edge case! This is the beauty of randomized testing: it allows us to leave the creativity of thinking of edge cases to randomness.
The tests you create will not be graded, but we still highly recommend that you write tests so that you’ll be able to test your code without the autograder.
Your code will not compile on the proj1c autograder until you implement the Deque
interface, the Iterable interface, and all of the required methods. So if you’ve done everything on the spec up
until this point, you should be using the
proj1a and proj1b graders, and not proj1c.
Iterable #
This and all later sections of the spec describe the Project 1c autograder.
We have a collection of elements in a Deque, so it makes sense that we might want to iterate over this
collection! Iterators are taught in the lecture on 09/19, and are required for the proj1c grader.
Modify your deque.LinkedListDeque and deque.ArrayDeque to implement the
Iterable interface.
MaxArrayDeque #
After you’ve fully implemented your ArrayDeque and tested its correctness, you will now build the MaxArrayDeque.
A MaxArrayDeque has all of the methods that an ArrayDeque has, but it also has 2 additional methods and a new
constructor:
public MaxArrayDeque(Comparator<T> c): creates aMaxArrayDequewith the givenComparator.public T max(): returns the maximum element in the deque as governed by the previously givenComparator. If theMaxArrayDequeis empty, simply returnnull.public T max(Comparator<T> c): returns the maximum element in the deque as governed by the parameterComparator c. If theMaxArrayDequeis empty, simply returnnull.
The MaxArrayDeque can either tell you the max element in itself by using the
Comparator<T> given to it in the constructor, or an arbitrary Comparator<T>
that is different from the one given in the constructor.
We do not care about the equals(Object o) method of this class, so feel free to define it however you think is most
appropriate. We will not test this method.
If you find yourself starting off by copying your entire ArrayDeque
implementation in a MaxArrayDeque file, then you’re doing it wrong. This is an exercise in clean code, and redundancy
is one our worst enemies when battling complexity! For a hint, re-read the second sentence of this section above.
There are no runtime requirements on these additional methods, we only care about the correctness of your answer.
Sometimes, there might be multiple elements in the MaxArrayDeque that are all equal and hence all the max: in in this
case, you can return any of them and they will be considered correct.
You should write tests for this part as well! They do not need to be nearly as robust as your randomized and timing
tests you created for the two Deque implementations above since the functionality you’re adding is fairly simple. You’ll
likely be creating multiple Comparator<T> classes to test your code:
this is the point! To get practice using Comparator objects to do something useful (find the maximum element) and to
get practice writing your own
Comparator classes. You will not be turning in these tests, but we still highly suggest making them for your sake.
You will not use the MaxArrayDeque you made for the next part; it’ll be in an isolated exercise.
As a reminder, your code will not compile on the proj1c autograder until you implement the Deque and Iterable
interfaces and all of the required methods in the next section.
Deque Interface #
In the last part of this project, we’re actually going to use the data structure you made to solve a real world problem.
Recall that we defined the Deque API, or behavior, by the following methods:
public void addFirst(T item)
public void addLast(T item)
public boolean isEmpty()
public int size()
public void printDeque()
public T removeFirst()
public T removeLast()
public T get(int index)
Since your program will rely on this behavior, it shouldn’t matter to it what Deque
implementation it is provided, ArrayDeque or LinkedListDeque, and should work for both. To achieve this, we will use
the power of interfaces.
This first task is going to be a little tedious, but it won’t take long.
Create an interface in a new file named Deque.java that contains all of the methods above. In IntelliJ, use “New
→ Java Class”. IntelliJ will assume you want a class, so make sure to replace the class keyword with interface.
Don’t forget to declare that the Deque interface is part of the deque package!
Modify your LinkedListDeque and/or ArrayDeque so that they implement the Deque
interface by adding implements Deque<T> to the line declaring the existence of the class. If IntelliJ yells at you
with an error message like:
The method ... of type LinkedListDeque has the same erasure as ... of type Deque but does not override it.
It means you forgot the generic T in the implements line (i.e. you wrote
implements Deque instead of implements Deque<T>).
If you used something other than T for your generic type parameter, use that instead. Add @Override tags to each
method that overrides a Deque method.
Now, in the Deque interface, give isEmpty() a default implementation, which returns true if the size() is 0.
Since your LinkedListDeque and ArrayDeque implement the Deque interface, given the default
isEmpty() implementation, you can remove that method from the LinkedListDeque and ArrayDeque that you implemented
earlier.
You should also use this new Deque interface to generalize your equals() methods in both
LinkedListDeque and ArrayDeque, so that you can compare a LinkedListDeque to an ArrayDeque
and vice versa.
Now, after you’ve implemented the Deque interface and removed the isEmpty()
method from your LinkedListDeque and ArrayDeque implementations, your code will compile on the full autograder.
Guitar Hero #
In this part of the project, we will create another package for generating synthesized musical instruments using
the deque package we just made. We’ll get the opportunity to use our data structure for implementing an algorithm that
allows us to simulate the plucking of a guitar string.
The GH2 Package #
The gh2 package has just one primary component that you will edit:
GuitarString, a class which uses anDeque<Double>to implement the Karplus-Strong algorithm to synthesize a guitar string sound.
We’ve provided you with skeleton code for GuitarString which is where you will use your deque package that you made
in the first part of this project.
GuitarString #
We want to finish the GuitarString file, which should use the deque package to replicate the sound of a plucked
string. We’ll be using the Karplus-Strong algorithm, which is quite easy to implement with a Deque.
The Karplus-Algorithm is simply the following three steps:
- Replace every item in a
Dequewith random noise (doublevalues between -0.5 and 0.5). - Remove the front double in the
Dequeand average it with the next double in theDeque(hint: useremoveFirst)andget()) multiplied by an energy decay factor of 0.996 (we’ll call this entire quantitynewDouble). Then, addnewDoubleto the back of theDeque. - Play the
double(newDouble) that you dequeued in step 2. Go back to step 2 (and repeat forever).
Or visually, if the Deque is as shown on the top, we’d remove the 0.2, combine it with the 0.4 to form 0.2988, add the
0.2988, and play the 0.2.

You can play a double value with the StdAudio.play method. For example
StdAudio.play(0.333) will tell the diaphragm of your speaker to extend itself to 1/3rd of its total
reach, StdAudio.play(-0.9) will tell it to stretch its little heart backwards almost as far as it can reach. Movement
of the speaker diaphragm displaces air, and if you displace air in nice patterns, these disruptions will be interpreted
by your consciousness as pleasing thanks to billions of years of evolution.
See this page for more. If you simply do StdAudio.play(0.9) and
never play anything again, the diaphragm shown in the image would just be sitting still 9/10ths of the way forwards.
Complete GuitarString.java so that it implements steps 1 and 2 of the Karplus-Strong algorithm. Note that you will
have to fill you Deque buffer with zeros in the GuitarString constructor. Step 3 will be done by the client of the
GuitarString class.
Make sure to add the libraries, as usual, otherwise IntelliJ won’t be able to find StdAudio.
For example, the provided TestGuitarString class provides a sample test
testPluckTheAString that attempts to play an A-note on a guitar string. If you run the test should hear an A-note when
you run this test. If you don’t, you should try the
testTic method and debug from there. Consider adding a print or toString
method to GuitarString.java that will help you see what’s going on between tics.
Note: we’ve said Deque here, but not specified which Deque implementation to use. That is because we only need those
operations addLast, removeFirst, and get and we know that classes that implement Deque have them. So you are
free to choose either the LinkedListDeque for the actual implementation, or the ArrayDeque. For an optional (but
highly suggested) exercise, think about the tradeoffs with using one vs the other and discuss with your friends what you
think the better choice is, or if they’re both equally fine choices.
GuitarHeroLite #
You should now also be able to use the GuitarHeroLite class. Running it will provide a graphical interface, allowing
the user (you!) to interactively play sounds using the gh2 package’s GuitarString class.
The following part of the assignment is not graded.
Consider creating a program GuitarHero that is similar to GuitarHeroLite, but supports a total of 37 notes on the
chromatic scale from 110Hz to 880Hz. Use the following 37 keys to represent the keyboard, from lowest note to highest
note:
String keyboard="q2we4r5ty7u8i9op-[=zxdcfvgbnjmk,.;/' ";
This keyboard arrangement imitates a piano keyboard: The “white keys” are on the qwerty and zxcv rows and the “black keys” on the 12345 and asdf rows of the keyboard.
The ith character of the string keyboard corresponds to a frequency of $440 \cdot 2^{(i - 24) / 12}$, so that the
character ‘q’ is 110Hz, ‘i’ is 220Hz, ‘v’ is 440Hz, and ‘ ‘ is 880Hz. Don’t even think of including 37 individual
GuitarString variables or a 37-way if statement! Instead, create an array of 37
GuitarString objects and use keyboard.indexOf(key) to figure out which key was typed. Make sure your program does
not crash if a key is pressed that does not correspond to one of your 37 notes.
Submission and Scoring #
To submit the project, add and commit your files, then push to your remote repository. Then, go to the relevant assignment on Gradescope and submit there.
The entire project is worth 1280 points.
As mentioned in the “Testing” section above, we have a rate limiting scheme in place for the three autograders:
- Project 1a and 1b: 3 tokens every 8 hours
- Project 1: 1 token every 8 hours until 09/20, when the rate changes to 1 token every 20 minutes
Just For Fun: TTFAF #
Once you’re relatively comfortable that GuitarString should be working, try running TTFAF. Make sure your sound is
on!
You can read the GuitarPlayer and TTFAF classes to figure out how they work.
TTFAF in particular includes (as commented-out code) an example of how to use it another way.
Even More Fun #
This part of the assignment is not graded and just for fun.
- Harp strings: Create a
Harpclass in thegh2package. Flipping the sign of the new value before enqueueing it intic()will change the sound from guitar-like to harp-like. You may want to play with the decay factors to improve the realism, and adjust the buffer sizes by a factor of two since the natural resonance frequency is cut in half by thetic()change. - Drums: Create a
Drumclass in thegh2package. Flipping the sign of a new value with probability 0.5 before enqueueing it intic()will produce a drum sound. A decay factor of 1.0 (no decay) will yield a better sound, and you will need to adjust the set of frequencies used. - Guitars play each note on one of 6 physical strings. To simulate this you can divide your
GuitarStringinstances into 6 groups, and when a string is plucked, zero out all other strings in that group. - Pianos come with a damper pedal which can be used to make the strings stationary. You can implement this by, on iterations where a certain key (such as Shift) is held down, changing the decay factor.
- While we have used equal temperament, the ear finds it more pleasing when musical intervals follow the small fractions in the just intonation system. For example, when a musician uses a brass instrument to play a perfect fifth harmonically, the ratio of frequencies is 3/2 = 1.5 rather than 27/12 ∼ 1.498. Write a program where each successive pair of notes has just intonation.
Why It Works #
The two primary components that make the Karplus-Strong algorithm work are the ring buffer feedback mechanism and the averaging operation.
- The ring buffer feedback mechanism. The ring buffer models the medium (a string tied down at both ends) in which the energy travels back and forth. The length of the ring buffer determines the fundamental frequency of the resulting sound. Sonically, the feedback mechanism reinforces only the fundamental frequency and its harmonics (frequencies at integer multiples of the fundamental). The energy decay factor (.996 in this case) models the slight dissipation in energy as the wave makes a round trip through the string.
- The averaging operation. The averaging operation serves as a gentle low-pass filter (which removes higher frequencies while allowing lower frequencies to pass, hence the name). Because it is in the path of the feedback, this has the effect of gradually attenuating the higher harmonics while keeping the lower ones, which corresponds closely with how a plucked guitar string sounds.
Tips #
- If you want to be able to run the full autograder but you’re getting compilation errors, you’ll need to do the
following:
- At the top of your ArrayDeque and LinkedListDeque classes, add
import java.util.Iterator. - Add an iterator method to your ArrayDeque and LinkedListDeque classes that looks like:
public Iterator<T> iterator() { return null; } - Change the class declaration for ArrayDeque to read
public class ArrayDeque<T> implements Deque<T>or whatever type parameter name you picked. That is, if you picked something other than T, use that instead. - Also change LinkedListDeque to read
public class LinkedListDeque<T> implements Deque<T>or whatever type parameter name you picked. - Create the Deque.java file as described above, with all the required methods (
addFirstthroughget).
- At the top of your ArrayDeque and LinkedListDeque classes, add
- If you’re stuck and don’t even know where to start: One great first step is implementing
SLListand/orAList. For maximum efficiency, work with a friend or two or three. - Take things a little at a time. Writing tons of code all at once is going to lead to misery and only misery. If you wrote too much stuff and feel overwhelmed, comment out whatever is unnecessary.
- If your first try goes badly, don’t be afraid to scrap your code and start over. The amount of code for each class isn’t actually that much (my solution is about 130 lines for each .java file, including all comments and whitespace).
- For
ArrayDeque, consider not doing resizing at all until you know your code works without it. Resizing is a performance optimization (and is required for full credit). - Work out what your data structures will look like on paper before you try implementing them in code! If you can find a willing friend, have them give commands, while you attempt to draw everything out. Try to come up with operations that might reveal problems with your implementation.
- Make sure you think carefully about what happens if the data structure goes from empty, to some non-zero size (e.g. 4 items) back down to zero again, and then back to some non-zero size. This is a common oversight.
- Sentinel nodes make life much easier, once you understand them.
- Circular data structures may take a little while to understand, but make life much easier for both implementations (
but especially the
ArrayDeque). - Consider a helper function to do little tasks like compute array indices. For example, in my implementation
of
ArrayDeque, I wrote a function calledint minusOne(int index)that computed the index immediately “before” a given index. -
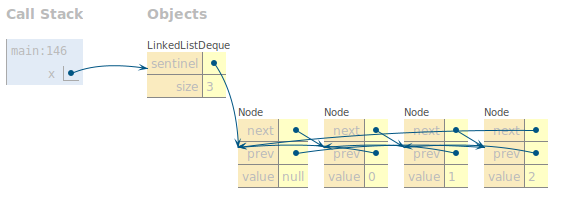
Consider using the Java Visualizer (which you installed in lab2setup) to visualize your Deque as you step through with the debugger. The visualizer is an icon of a blue coffee cup with an eye, and is the tab next to the “Console” tab in the debugger panel). See the CS 61B plugin guide if you can’t figure out how to get the visualizer to show. The visualizer will look something like this:
Credits:
- Ring buffer figures from wikipedia.
- This assignment adapted from Kevin Wayne’s Guitar Heroine assignment.