FAQ #
Each assignment will have an FAQ linked at the top. You can also access it by adding “/faq” to the end of the URL. The FAQ for Lab 1 is located here.
Learning Goals #
In this lab, we will set up the software that we will use throughout the course: the terminal, git, java, IntelliJ, etc. We will also look at a small Java program and learn a little bit about Java syntax.
Before You Begin #
Welcome to CS 61B! We have a wonderful fall semester planned for y’all, and we’re so excited that you’ll be joining us!
First things first: setup! In this class, you’ll be using real-world tools, and that means that you’ll likely run into real-world problems with configuration and setup these first few days. Don’t be discouraged, and make sure to ask for help if you’re stuck! The best place to ask for help is during your actual lab time. If you attempt to do this outside of that time and run into any problems, please come ask then through Ed or any additional labs/office hours. We’re holding many, many more office hours the first two weeks, so please stop by!
If ever something isn’t working, or a screen that should show up isn’t showing up, make sure you ask for help – do not keep going because this might make it more difficult for us to identify the problem later on if you do hit a dead-end.
Partners #
For all labs, official partners will not be supported by CS61B staff. That being said feel free to collaborate according to the collaboration guidelines outlined in the course syllabus. In fact, we encourage coming to lab to collaborate in-person with fellow classmates!
Personal Computer Setup #
Task: Installing a Text Editor #
If you don’t already have a favorite text editor, we recommend installing one.
The most popular GUI text editors these days seem to be:
- Sublime Text (free but nags you until you pay): https://www.sublimetext.com/
- Atom (free): https://atom.io/
- Visual Studio Code (free): https://code.visualstudio.com/
See this text editor review for a more thorough look at these and other text editors.
The choice isn’t very important, as we will only be using a text editor a few times throughout the course. Later in this lab, and for the rest of the course, we will be using an IDE.
You do not need to pick one of the options above. You’re welcome to use a different text editor entirely (built-in text editors, vim, emacs, etc).
You should be able to use the default installation recommendations, but if you run into problems, do not hesitate to ask for help!
Task: Configure Your Computer #
Depending on your operating system, there are a few things we need to do to set your computer up for 61B.
The precise steps to take depend on your operating system.
Move on to the next section only once you’ve completed the instructions above for your operating system.
Advanced users on Windows may also use the new WSL feature, but we will not be providing official directions or support. Note that if you use WSL, you’ll need to do the setup on both Windows and WSL (Linux), following the instructions above.
The Terminal #
Learn to use the Terminal #
In CS 61B we will be using the terminal extensively, even more than you likely did in previous classes. Bash commands can be pretty powerful and will allow you to create folders or files, navigate through your file system, etc. To jump start your knowledge we have included a short guide of the most essential commands that you will be using in this class. Please carefully read this and try to familiarize yourself with the commands. We will help you as you get started, but by the end of the class we hope that you will have become a proficient user of the bash terminal!
-
cd: change your working directorycd hwThis command will change your directory to
hw. -
pwd: present working directorypwdThis command will tell you the full absolute path for the current directory you are in if you are not sure where you are.
-
.: means your current directorycd .This command will change your directory to the current directory (aka. do nothing).
-
..: means one parent directory above your current directorycd ..This command will change your directory to its parent. If you are in
/workspace/day1/, the command will place you in/workspace/. -
ls: list files/folders in directorylsThis command will list all the files and folders in your current directory.
ls -lThis command will list all the files and folders in your current directory with timestamps and file permissions. This can help you double-check if your file updated correctly or change the read-write- execute permissions for your files.
-
mkdir: make a directorymkdir dirnameThis command will make a directory within the current directory called
dirname. -
rm: remove a filerm file1This command will remove file1 from the current directory. It will not work if
file1does not exist.rm -r dir1This command will remove the
dir1directory recursively. In other words, it will delete all the files and directories indir1in addition todir1itself. Be careful with this command! -
cp: copy a filecp lab1/original lab2/duplicateThis command will copy the
originalfile in thelab1directory and and create aduplicatefile in thelab2directory. -
mv: move or rename a filemv lab1/original lab2/originalThis command moves
originalfromlab1tolab2. Unlikecp, mv does not leave original in thelab1directory.mv lab1/original lab1/newnameThis command does not move the file but rather renames it from
originaltonewname.There are some other useful tricks when navigating on a command line:
-
Your shell can complete file names and directory names for you with tab completion. When you have an incomplete name (for something that already exists), try pressing the
tabkey for autocomplete or a list of possible names. -
If you want to retype the same instruction used recently, press the
upkey on your keyboard until you see the correct instruction. This saves typing time if you are doing repetitive instructions.
Task: Terminal Test Run #
Let’s ensure that everything is working.
-
First open up your terminal. Check that git is a recognized command by typing the following command:
git --versionThe version number for git should be printed. If you see “git: command not found”, or similar, try opening a new terminal window, restarting your computer, or installing git again.
-
Second, let’s check that
javacandjavaare working.javacandjavaallow Command Line Compilation, or in other words, the ability to run Java programs directly from the command line. In practice, most developers run Java programs through an IDE like IntelliJ, so we won’t be using command line compilation for much this semester other than testing your setup. Start by running the following commands at your terminal.mkdir ~/temp cd ~/temp-
Then, open your operating system’s file explorer in this directory. You can do this from the command line:
- Mac:
open . - Windows:
explorer . - Ubuntu:
gnome-open . - Linux Mint:
xdg-open .ormate .
- Mac:
-
In this newly opened directory, create a file
HelloWorld.javawith these contents:public class HelloWorld { public static void main(String[] args) { System.out.println("Hello world!"); } }Note that in addition to the file finder or explorer, you are able to create a file using the
touchin the terminal; try creating the file usiingtouch HelloWorld.javafrom the terminal! Then feel free to open the file using your favorite text editor and add the code. -
In your terminal, enter
ls(list the files/folders in this directory). You should seeHelloWorld.javalisted. -
Run
javac HelloWorld.java. If this produces any output, then something may be wrong with your setup. Try opening a new terminal window or restarting your computer. If that still doesn’t work, see the Troubleshooting section under the directions for your operating system. -
Type
ls, you should see bothHelloWorld.javaand a freshly createdHelloWorld.class(thejavaccommand created this file). -
Run
java HelloWorld. It should print out “Hello world!” for you. If it didn’t, something is wrong with your setup! -
You’re done! You can also delete the “temp” folder and its contents as you please.
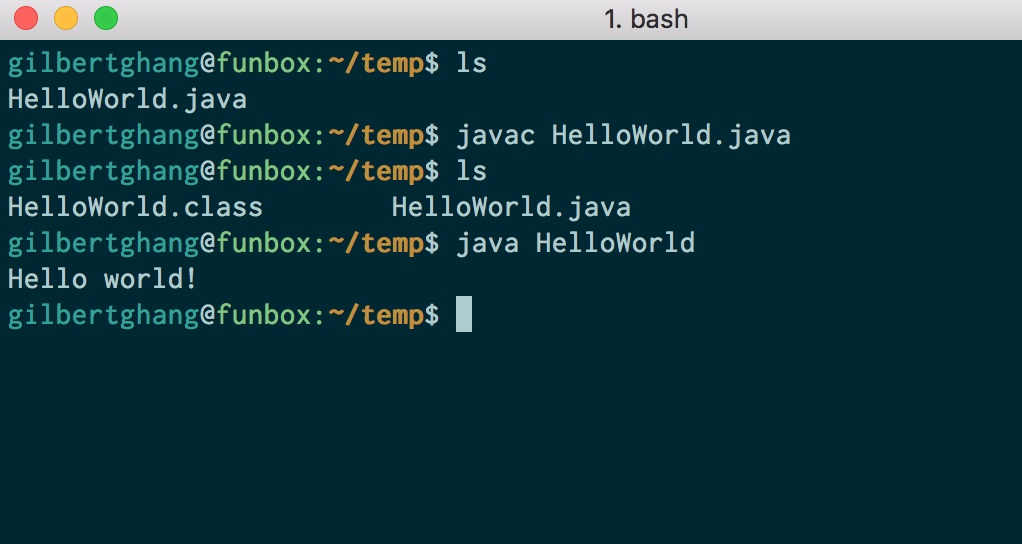
The screenshot below shows what we’re hoping for when we do steps 4-7. If you see something similar to this, your java setup is complete.
-
GitHub and Beacon #
Instead of bCourses, CS 61B uses an in-house system for centralizing your grades and student information called Beacon.
In this section, we’ll set up your Beacon account as well as your CS 61B GitHub repository (“repo”), which you will need to submit all coding assignments.
Task: Account Setup #
- Create an account at GitHub.com. If you already have an account, you do not need to create a new one.
- Go to the Beacon website and you’ll be guided through a few steps to complete your GitHub repository registration. Please follow them carefully! You must be logged in to your Berkeley account to complete the Google Form quiz. If any errors occur while you’re working through the steps, please let your TA know immediately.
- After completing all of the steps, you should receive an email inviting you to collaborate on your course GitHub repository; accept the email invitation from both emails and you should be good to go. This email will be sent to the email that you used to create your GitHub account, which may not necessarily be your Berkeley email. Hooray! Don’t follow the instructions that GitHub says you might want to do – instead, follow the instructions given later in this lab.
Your Repository #
Your repository will have a name containing a number that is unique to you!
For instance, if your repo is called “fa22-s42”, you’ll be able to visit your
private repository at https://github.com/Berkeley-CS61B-Student/fa22-s42
(when logged into GitHub). If your repo number is not “42” this link will not
work for you. Replace “42” with your own to see your repo on Github.
Additionally, the instructors, TAs, and tutors will be able to view your repository. This means you can (and should!) link to your code when asking private debugging questions in Ed or Gitbugs. No other students will be able to view your repository.
As a reminder, you may not post code from this course publicly, even after completing the course. Doing so is a violation of our course policies and you might be subject to disciplinary action.
Git #
In this course, you’ll be required to use the Git version control system, which is wildly popular out in the real world. Since the abstractions behind it are fairly tricky to understand, don’t be worried if you encounter significant frustration as you learn to use git. Towards the middle of the semester, we’ll be learning the inner workings of git in much greater detail but, for now, let’s just get a working knowledge of how to use git.
Before you proceed, read sections up to the Remote Repositories section of the Using Git Guide.
Do not proceed until you have read sections up to the Remote Repositories section of the Using Git Guide. You do not need to read past that.
Task: Git Exercise #
Now that you’ve read the first 3 sections of the Using Git Guide, you’re ready to start using git! As part of your lab checkoff, you will be working through a small git workflow by setting up a git repository and making a couple commits to the repository. An academic intern or staff member will look at your git repository during checkoff to ensure that it is in a good state. As an alternative, feel free to complete the asynchronous checkoff option, which doesn’t require an academic intern or staff member.
If you need help with creating directories, creating files, changing directories, etc., refer back to Learn to use the Terminal.
If at some point during this exercise git prompts you to update your username and email, now is a good time to change your git name and email
- Create a directory called
lab01-checkoff. You can put this directory anywhere on your computer (unless you have already cloned yourfa22-s***repository, in which case, you should not put this directory inside of yourfa22-s***repo). - Move into the
lab01-checkoffdirectory, and initialize a git repository in this directory. - Create a file called
61b.txtin any way you’d like. In this text file, add the text “61b version 1” into it. - Create another file called
61bl.txtin any way you’d like (cs61bl refers to the summer offering of the course, for those who are curious). In this text file, add the text “61bl version 1” into it. - Begin tracking only
61b.txt, and create a new commit containing just this file, with the following commit message: “Add 61b.txt”. - Make a modification in
61b.txtby changing the text in the file to: “61b changed to version 2”. - Make another commit, this time containing both
61b.txtand61bl.txt. The commit message should be: “Update 61b.txt and add 61bl.txt”. - Finally, make one more modification to
61b.txtby changing the text in the file to: “61b changed to version 3”. Don’t commit this version.
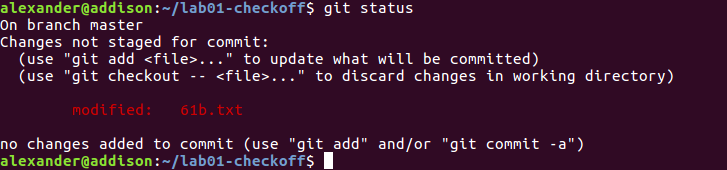
At this point, if you were to type in git status, something like this should
show:
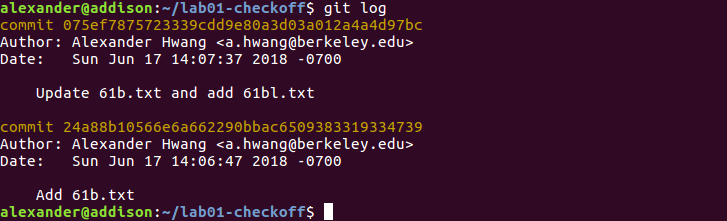
Also, if you were to run git log, something like this should show:
Be sure to save this repository and directory until you get checked-off by a lab assistant, or until you complete the asynchronous checkoff form on beacon and obtain a magic word, to be used later in the lab.
Along with other short conceptual questions involving git, you will be asked to
revert 61b.txt back to the version in the most recent commit, as well as back
to the earliest version of the file, so make sure you know how to do this!
Hint: Look into the checkout command. But be careful when using the
checkout command, as your repo might end up in an unexpected state.
For this exercise make sure to always specify a file (or directory) when you
use checkout.
Specifically, if you see something about your repository being in a detached HEAD state as a result of a checkout command, that is something we don’t want. Read the git-WTFS guide for more on what it is and how to fix it.
You can and should continue doing the lab if there is a queue to get checked off. We’ve also added the option to complete an asynchronous checkoff form on beacon if you feel you are comfortable with the material and are ready to move ahead. Be sure to save the magic word!
Git and Remote Repos #
First, read the Remote Repositories section of the Using Git Guide.
In this course, you’ll be required to submit your code using Git to your course GitHub repository that you created in Account Setup. This is for several reasons:
- To spare you the incredible agony of losing your files.
- To submit your work for grading and to get results back from the autograder.
- To save you from the tremendous anguish of making unknown changes to your files that break everything.
- To ensure that we have easy access to your code so that we can help if you’re stuck.
- To dissuade you from posting your solutions on the web in a public GitHub repository. This is a major violation of course policy!
- To expose you to a realistic workflow that is common on every major project you’ll ever work on in the future.
Task: Setting up your Git Repository #
Clone your fa22-s*** Git Repository #
Navigate to the spot in your folders on your computer that you’d like to start
your repository. In the example below, we’re assuming you want all your stuff
in a folder named cs61b, but you can pick a different name if you’d like.
cd cs61b
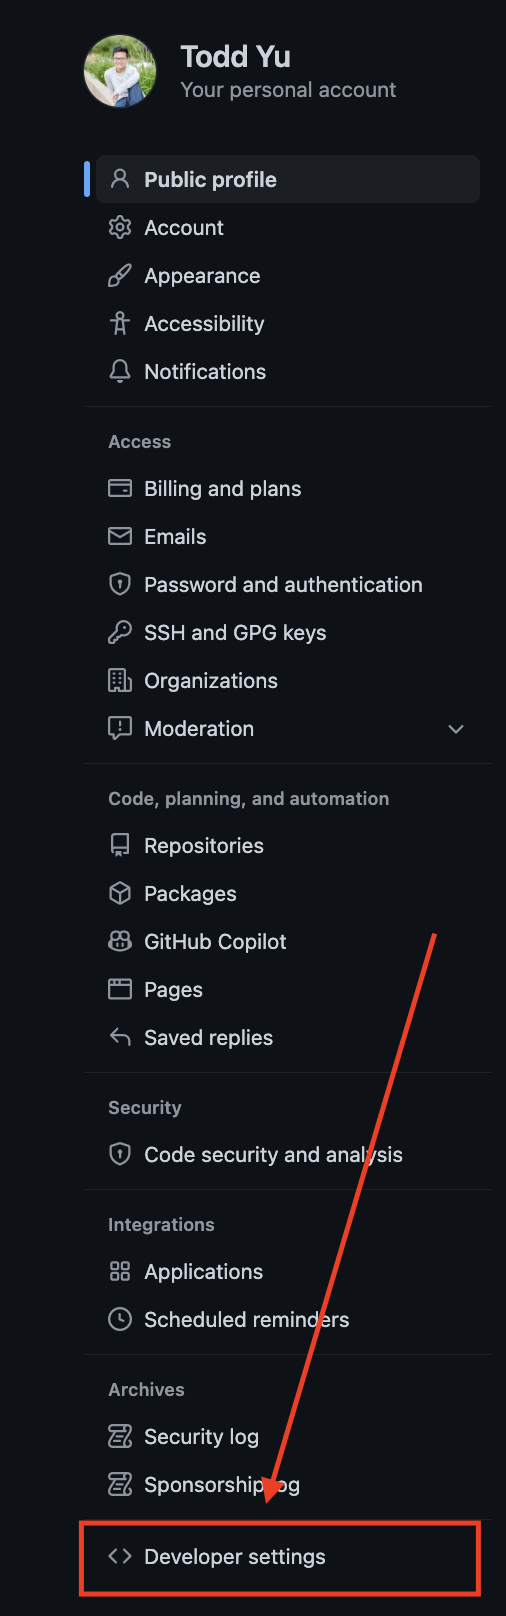
In order to clone your Github repo, your local computer needs to setup Github access credentials. Go to github.com, sign in with your Github username and password, and click the user profile in the top right corner, then click to “Settings”:

Then click on the “developer settings” tab:
and generate a new personal access token:

Make sure to name the token, and ensure the token is set to “no expiration” and has access to “repo” permissions, as shown below:
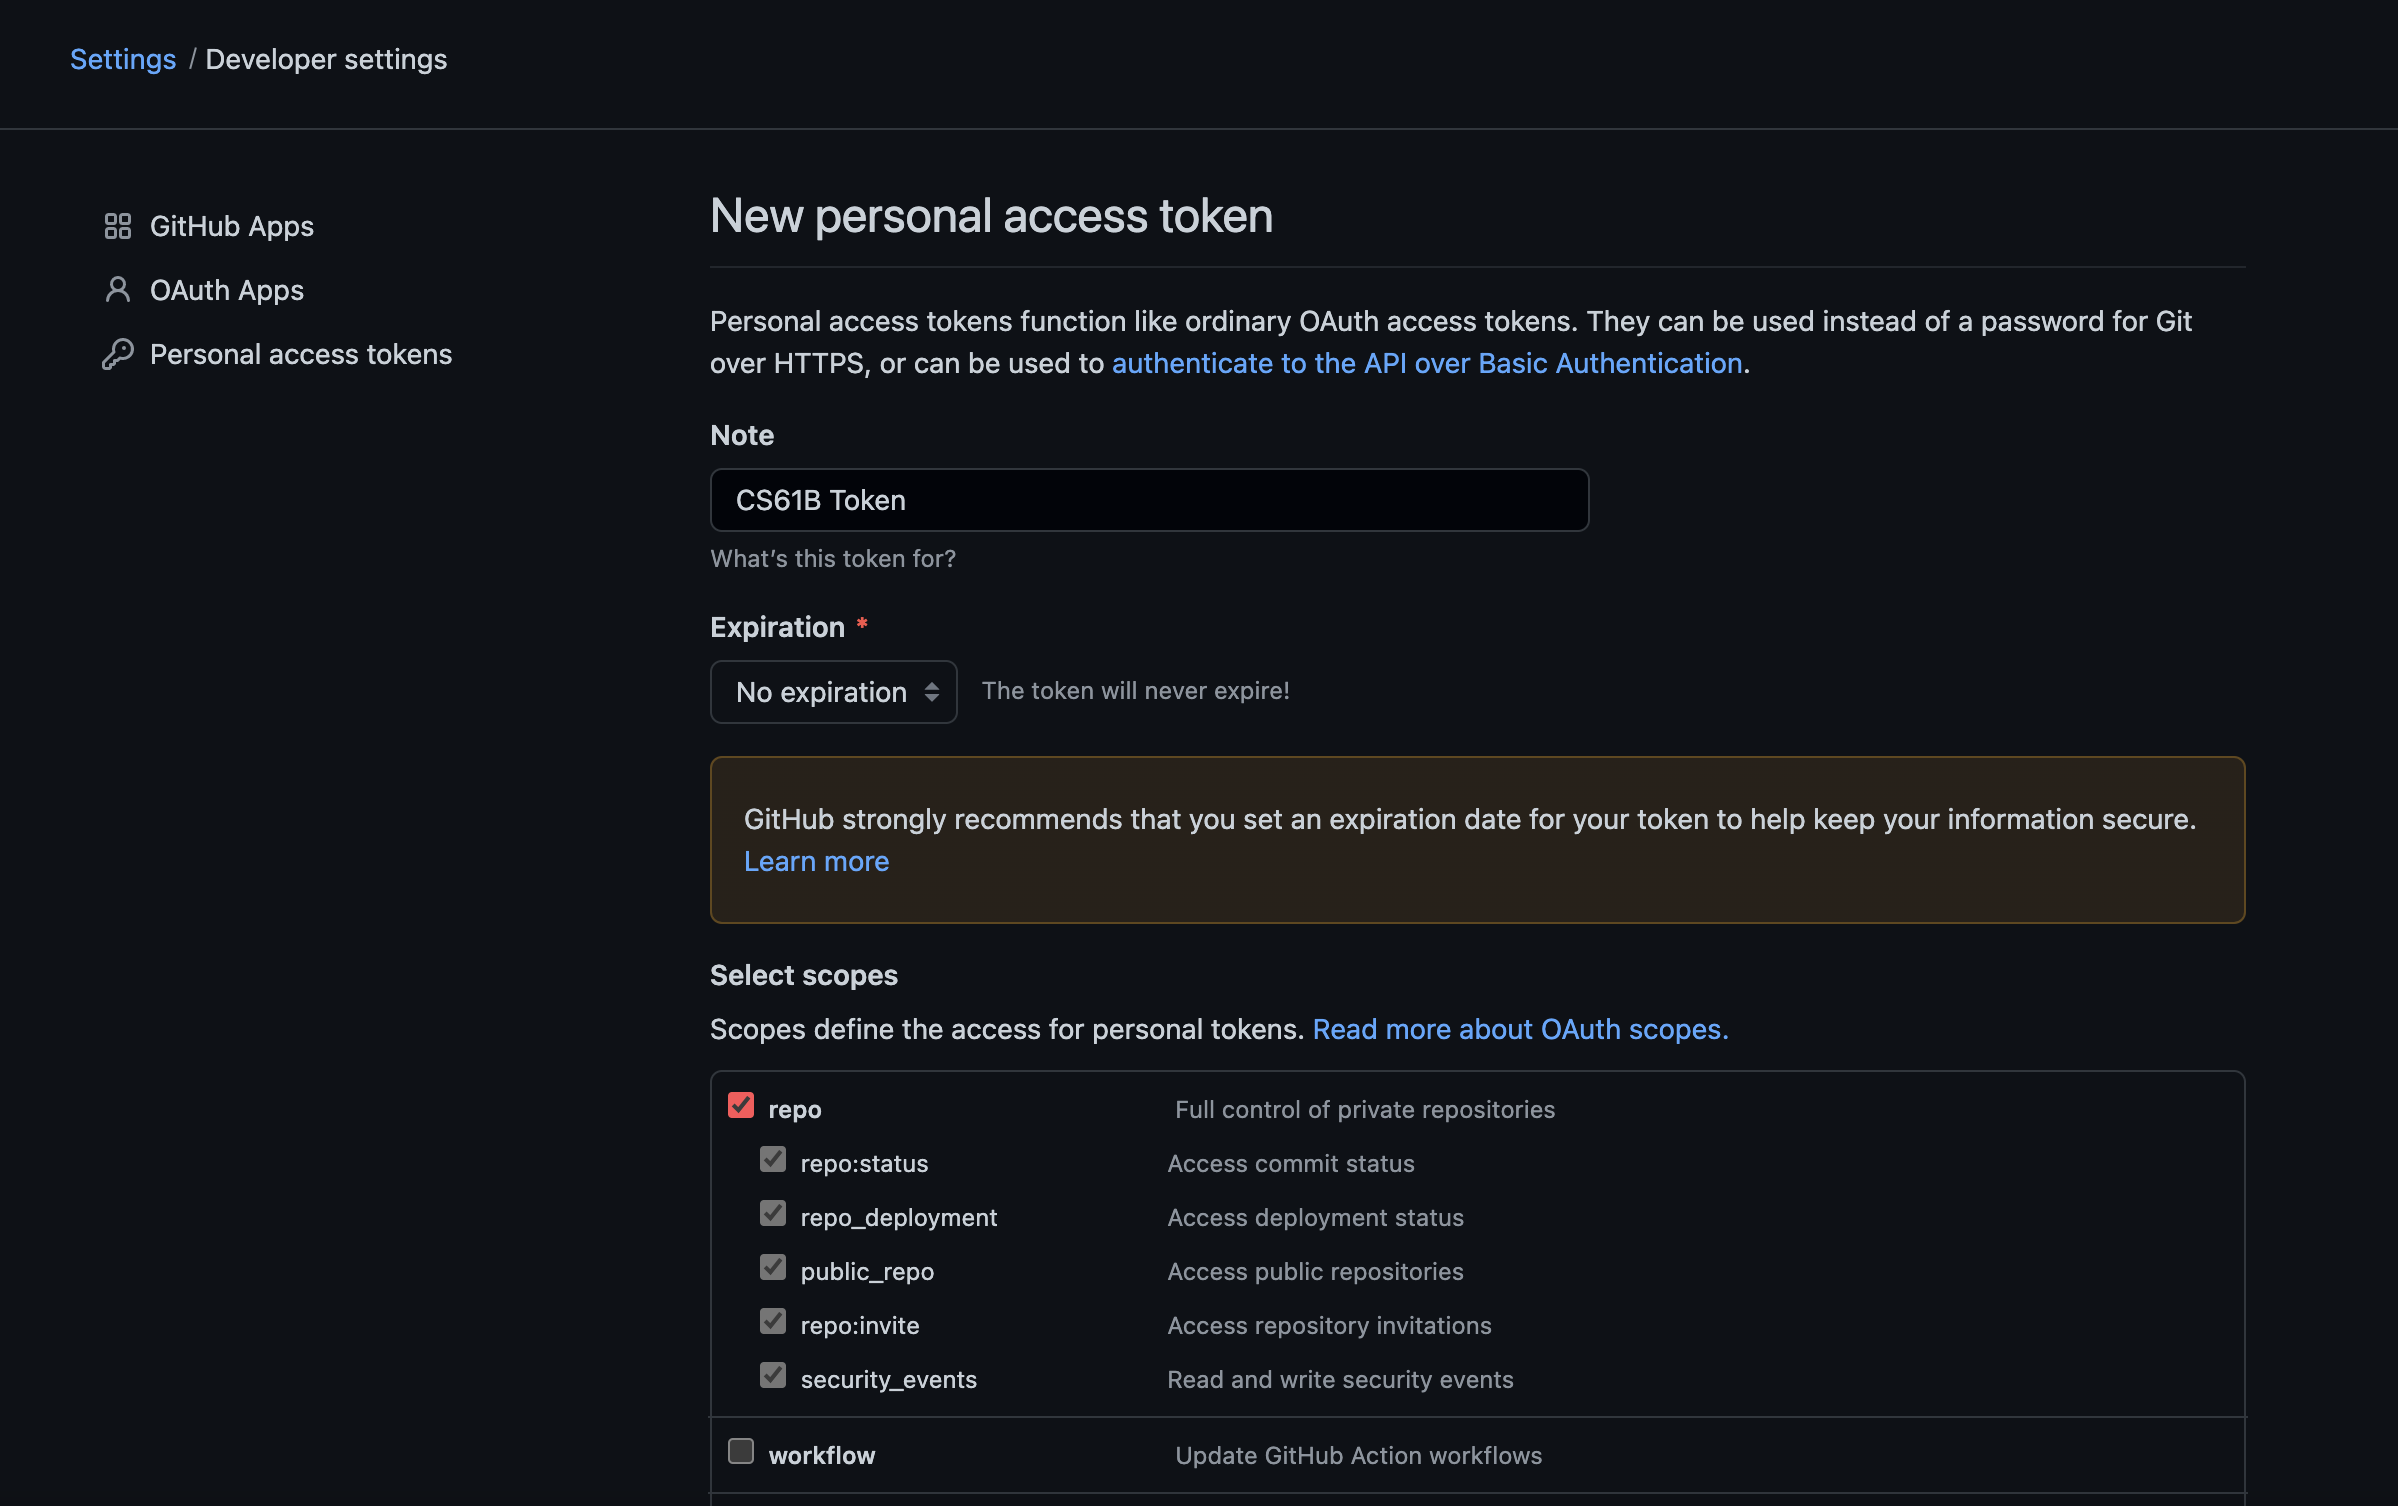
Then, when you’re ready, scroll to the bottom of the page and press the green “Generate Token” button.
Be sure to copy the token Github presents. Treat and protect this token as another password; do not upload it to the internet. Malicious actors can use this token to impersonate you and perform nefarious acts. CS61B staff assumes no responsibility for lost/misplaced tokens and any subsequent consequences.
After obtaining a token, enter the following command to clone your GitHub repo. Make sure to replace the
*** with your class repository number (this should be the repo number you
were assigned through Beacon, not your lab section number).
git clone https://github.com/Berkeley-CS61B-Student/fa22-s***.git
You should be prompted for a username and password:
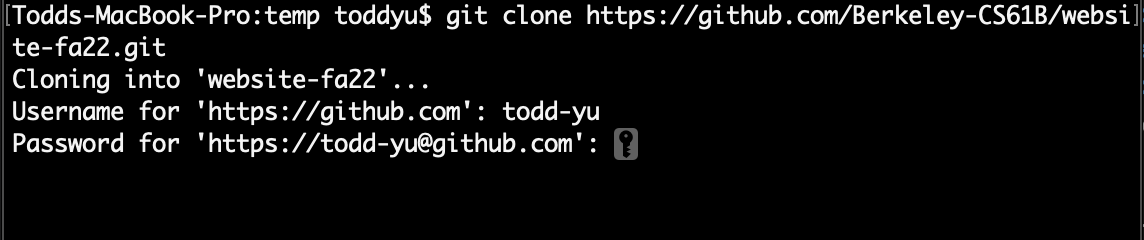
Enter your Github username, and use the token generated previously as the password. The token should be automatically saved in your computer’s keychain at this point.
After cloning your terminal will report “warning: You appear to have cloned
an empty repository.” This is not an issue, it is just git letting you know
that there are no files in the repo, which is what we expect here.
Alternatively, you can also set up SSH access so you don’t need to type in your GitHub password every time you use your repository. Feel free to follow the relevant instructions on GitHub instead. If you don’t know what that means, just use the command above.
Move into your newly created repo!
cd fa22-s***
Now we will add the skeleton remote repository. You will pull from this
remote repository to get starter code for assignments. (Make sure that you are
within the newly created repository folder when you continue with these
commands.) Enter the following command to add the skeleton remote.
git remote add skeleton https://github.com/Berkeley-CS61B/skeleton-fa22.git
Listing the remotes should now show both the origin and skeleton remotes.
git remote -v
If you see an error like fatal: not a git repository make sure you have
properly moved into the fa22-s*** directory using cd.
Change your Git name and email #
Every time a commit is made, your name and email address is recorded as part of the commit. Change your Git name and email by running the following commands, substituting your own name and email address where appropriate.
git config --global user.name "<your name>"
git config --global user.email "<your email>"
Change your Git text editor #
We’ll also change the text editor associated with Git. Sometimes, Git needs your help when inputting things like commit messages, so it will open a text editor for you. Follow the instructions here and make sure that you follow the correct instructions for your operating system.
Task: Working on the Skeleton #
You must now pull from the skeleton remote in order to get the starter code
for this lab. You will also do this when new projects and assignments are
released (or if there is ever an update to an assignment). To do this, ensure you are in your fa22-s*** repo and then use the spookiest command in the whole git toolbox:
git pull skeleton main
What this does is fetch all remote files from the repo named skeleton (which
is located at https://github.com/Berkeley-CS61B/skeleton-fa22.git) and copy them into
your current folder.
If you get an error similar to fatal: refusing to merge unrelated histories,
you can fix this by, for this time only, running:
git pull --rebase --allow-unrelated-histories skeleton main
If you list the files in your current directory, you’ll see that there is a new folder: lab01.
Look in the lab01 folder and you’ll see files called LeapYear.java,
Collatz.java, and magic_word.txt that you’ll work with in later
parts of this lab.
This lab will continue with the installation of IntelliJ. While this is taking time to download, feel free to read / skim our Using IntelliJ Guide. You don’t need to read or internalize all of this to complete the lab. IntelliJ is complicated, but the core features should feel somewhat familiar to text editors you have used in the past. When you do have more time, we strongly suggest going through the linked guides and videos to maximize your ability to use the IDE.
Note that IntelliJ will be utilized more in later labs, but we highly recommend downloading it now to use for the project and gain familiarity.
IntelliJ Setup #
IntelliJ is an Integrated Development Environment or IDE. An IDE is a single program which combines typically a source code editor, tools to compile and run code, and a debugger. Some IDEs like IntelliJ contain even more features such as an integrated terminal and a graphical interface for Git commands. Finally, IDEs also have tools like code completion which will help you write Java faster.
We will not be forcing you to use IntelliJ if you choose not to, but we highly recommend that you do use it. The debugger and other features will make it well worth the time it takes to learn as they should make you a more efficient programmer and one that can solve problems on your own. Additionally, IntelliJ is an industry-standard tool that you will almost certainly encounter if you work with Java again in the future.
From this point forward we will assume that you are using IntelliJ and if you do not we will not necessarily be able to offer the same support (e.g. if you use another program like VSCode for this class, our staff will not be able to help you with any problems like we would had you chosen to use IntelliJ).
Be prepared to use a real world software development package. It will seem very complicated for a while, but we’ll lead you down the narrow path to success. Ask for help if you are stuck! It can be very hard to guess the right thing to do in IntelliJ. We also offer the IntelliJ WTFS Guide to solve some of the common problems.
Prerequisites #
- You have installed Java 17 or higher. Java 18 will work for our class.
- You have successfully created your local repo for the class on your own
machine. This is the
fa22-s***repository you earlier. - You have pulled from the skeleton, and you have a
lab01directory.
Task: Installing IntelliJ #
- Download the Community Edition of IntelliJ from the JetBrains website. As a student you can actually get a student license for the Ultimate version, but there are not any additional features that we will use for this class. It is recommended and assumed that you proceed with the Community Edition.
If you have an M1 Mac, select “.dmg (Apple Silicon)”. If you have a non-M1 Mac, select “.dmg (Intel).”
-
After selecting the appropriate version for your OS, click download and wait a few minutes for the file to finish downloading.
-
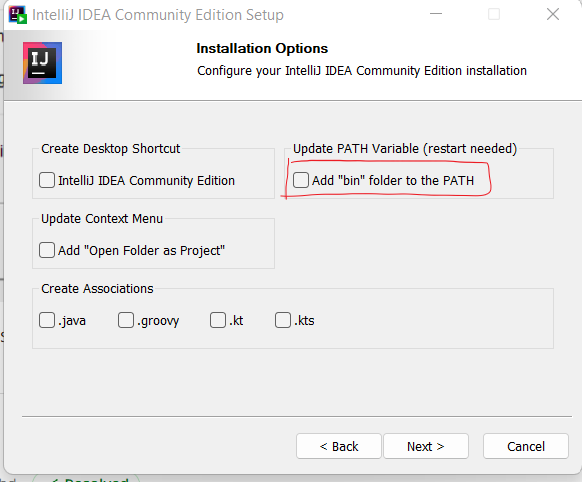
Run the installer. If you have an older version of IntelliJ, you should uninstall it at this time and replace it with this newer version. You can use all of the default installation options, with one exception, if you are on Windows, make sure you check the box “Add launchers dir to the PATH”. If you accidentally missed it, the easiest fix is to uninstall intelliJ, and running the installer again, making sure you check that box the second time around. The image below only applies to Windows.
Task: Installing Plugins #
Begin the setup process by starting up IntelliJ. Then follow the steps below.
Make sure you’re running IntelliJ Version 2020.3.1 or later before continuing. We are using IntelliJ Version 2022.1.2. Older versions may also work but we haven’t tried them ourselves.
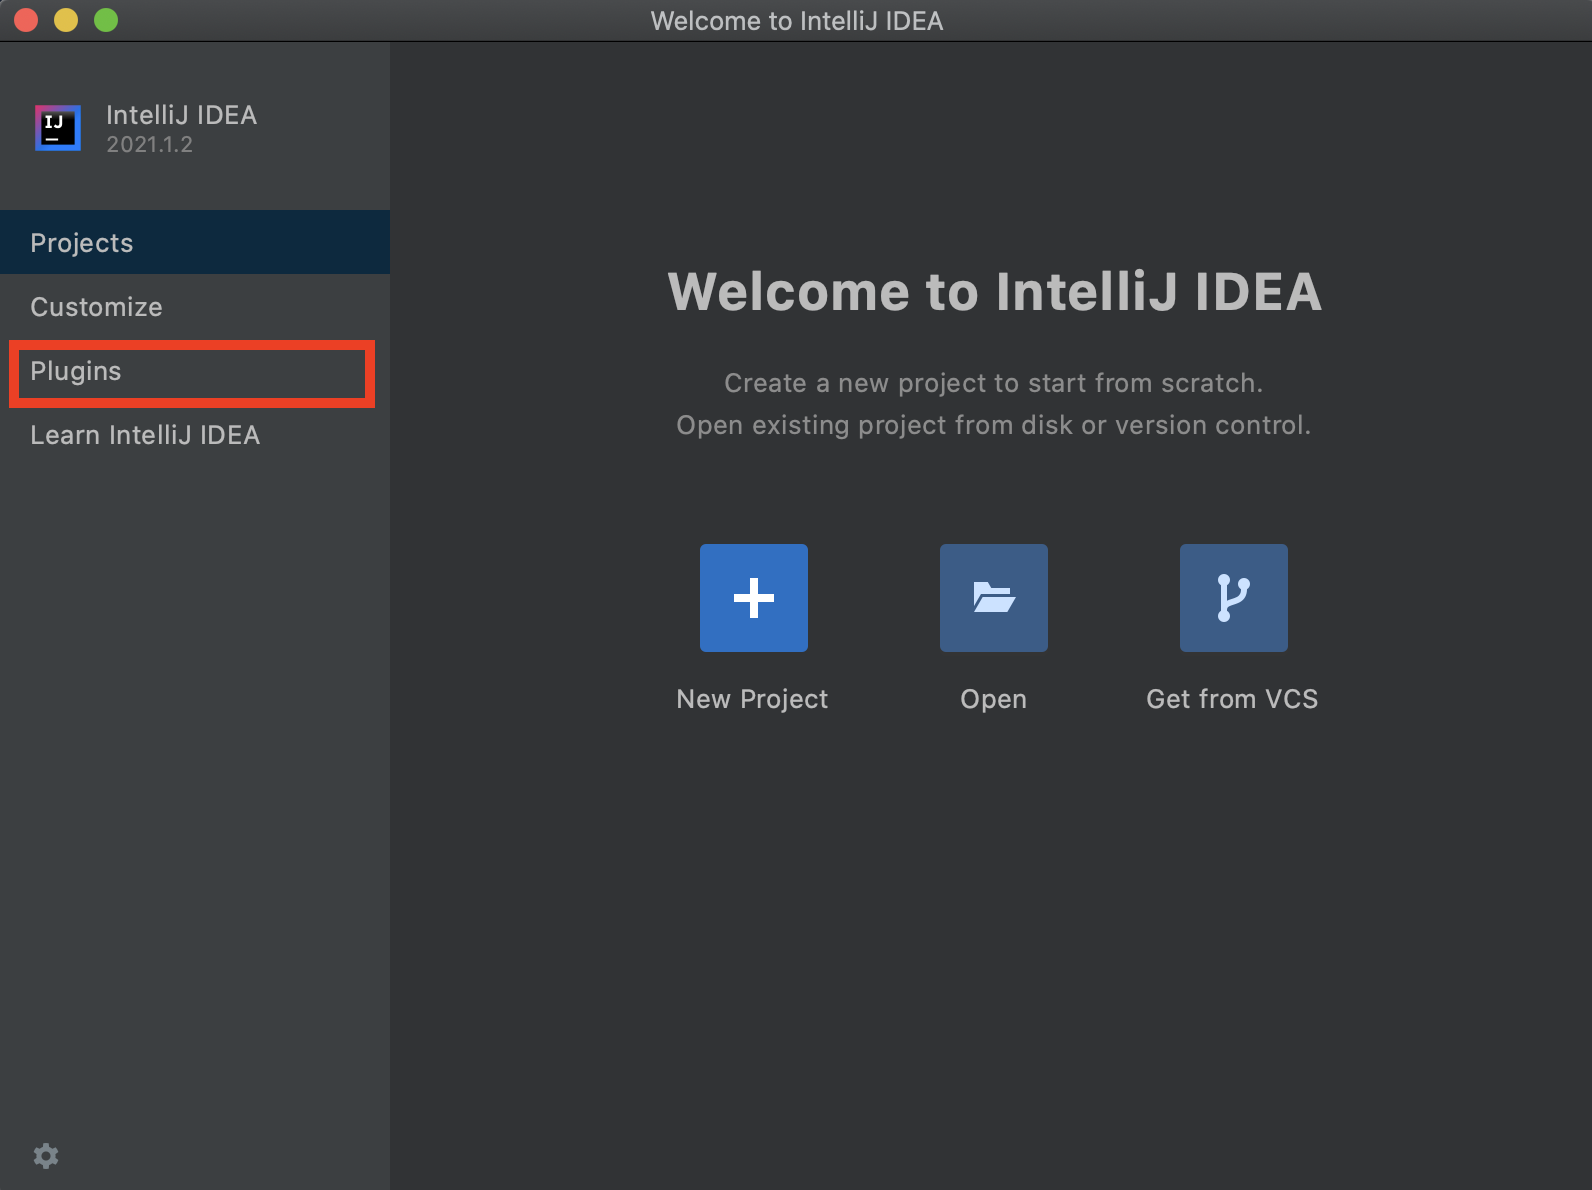
-
In the Welcome window, click the “Plugins” button in the menu on the left.
-
On the window that appears, click “Marketplace” and enter “CS 61B” in the search bar at the top. The CS 61B plugin entry should appear. If you click the autocomplete suggestion, a slightly different window from what is shown below may appear – this is okay.
-
Click the green Install button, and wait for the plugin to download and install.

-
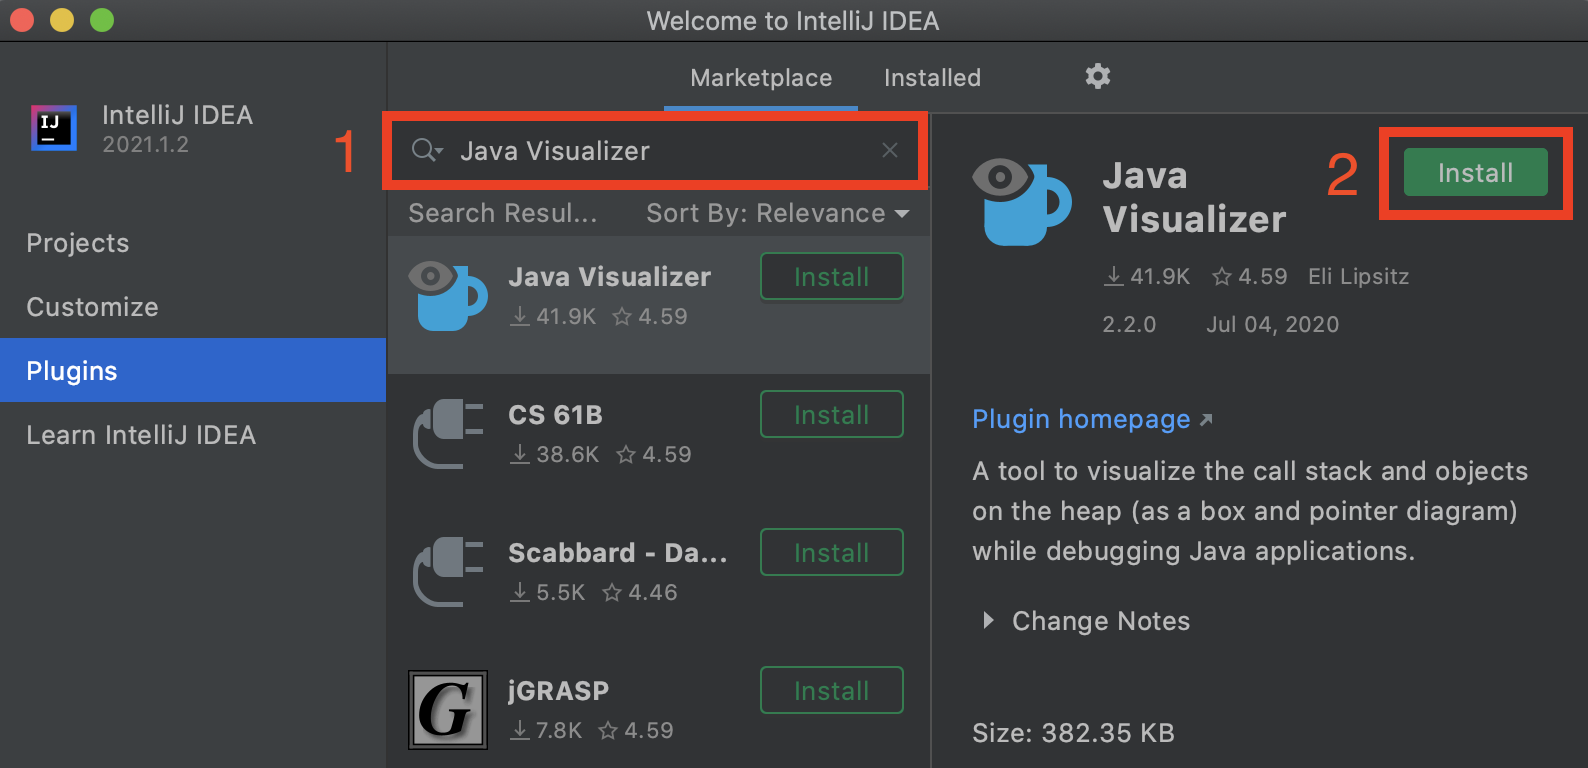
Now, search for “Java Visualizer”, and click the green Install button to install the plugin.
-
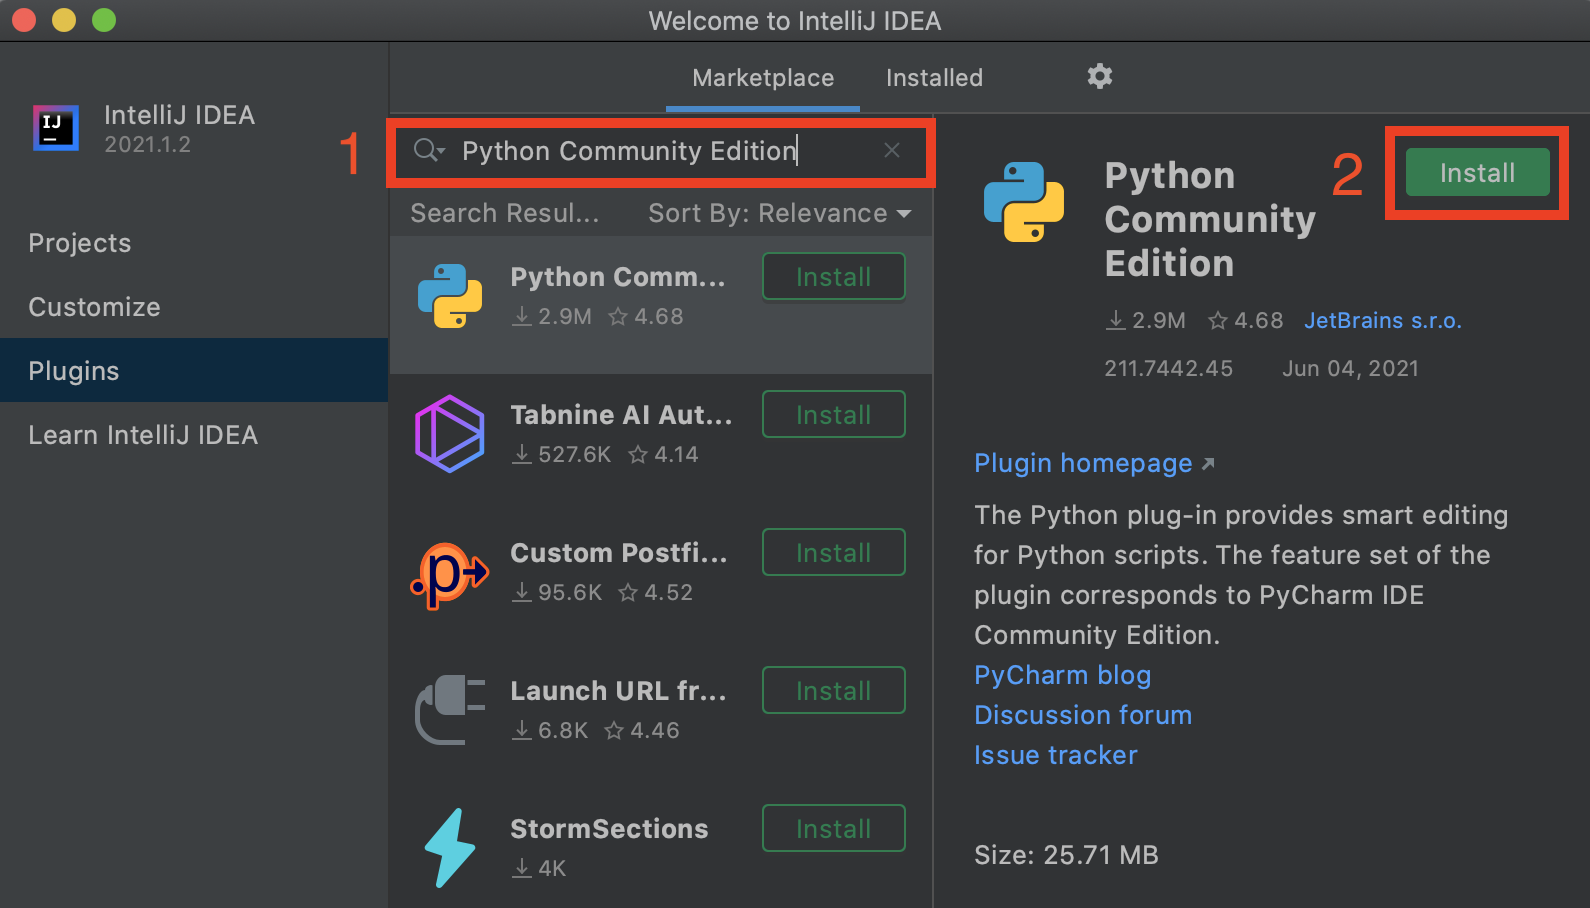
Finally, search for “Python Community Edition”, and click the green Install button to install the plugin.
-
If it appears, click the green Restart IDE button to finalize the installation. If you don’t see a Restart IDE button, just continue.
For more information on using the plugins, read the plugin guide. You don’t have to read this right now.
Task: Setting Up Java Libraries #
Like in Python, we sometimes want to use libraries that others wrote. Java dependency management is a bit of a hellscape, so we will instead provide a Git repo that contains all the dependencies that we will use in this course.
First, move out of your fa22-s*** repo with cd ... Then, run:
git clone https://github.com/Berkeley-CS61B/library-fa22
Below is shown the directory structure of library-fa22. Look inside the
folder using ls library-fa22 and make sure you see the four .jar files listed below. If you’re using your operating system’s file explorer, the jar part might not show up in the
filenames, and that’s OK.
library-fa22
├── algs4.jar
├── junit-platform-console-standalone-1.9.0.jar
├── ucb.jar
└── xchart-3.8.1.jar
Task: Creating Projects #
The following instructions apply for both this lab and for future assignments.
Each time after pulling from skeleton to get new lab or project files, you
will need to run through the following steps again.
-
Start up IntelliJ.
-
Upon opening IntelliJ, click on the “Open” option.

-
Find and choose the directory of your current assignment (for today’s lab, it should be the
lab01directory), then press the OK button.
-
You should at this point be greeted with the main screen of IntelliJ which should look like the following. If you are greeted with any additional screens when setting up the project you can go ahead and select the default options for now.

-
Now we will set up the SDKs. Navigate to the “File -> Project Structure” menu,

and then make sure you are in Project tab. Afterwards, set your project SDK to your installed Java version (17 or 18). If 17 or higher isn’t available in the dropdown, make sure you downloaded the Java SDK earlier in the setup steps, and then execute the following:


-
Finally we will add the Java libraries. Note that you don’t need the libraries for this lab, but it is good practice walking through these steps going forward. Navigate to the “File -> Project Structure” menu, then select “Libraries” in the sidebar. You should be greeted with a screen that looks like this.

-
Click the “+ -> Java” button, which should prompt you to select the file location. Navigate to your
library-fa22repo and select all of the*.jarfiles (i.e. select all of the files that end in.jarin thelibrary-fa22folder).
Next, if prompted to add the library to the
lab01module, select “Ok”. After these steps the libraries tab should look like the following with all of the.jarfiles listed here.
At this point if things have been configured correctly each Java file should have a blue circle next to its name, and when you open the file
LeapYear.javafile you should see a green triangle near the line numbers on line 5. Further, none of the code should be higlighted in red.
Task: IntelliJ Test #
To test if everything is working correctly, run the LeapYear class, as shown below:

Since you haven’t implemented this function yet, the code should error as shown below, which is expected!
Please fill out the isLeapYear method by adding a return true; statement. We need to do this for Java to compile your future code in this Lab. Your isLeapYear method should look like the following:
public static boolean isLeapYear(int year) {
    // Optional TODO: Fill in this method.
    return true;
}
OPTIONAL: See if you are able to implement the full LeapYear method! Leap Years are defined as a year divisible by $400$ or divisible by $4$ and not by $100$. For example, 2000 and 2004 are leap years. 1900, 2003, and 2100 are not leap years.
We will not be requiring any further edits to this file to receive full credit for this lab, but feel free to explore this file on your own. Run the LeapYear class by clicking the green arrow next to line 5 to test your code. Again, you are not required to complete the LeapYear class.

Task: Submitting to Github #
Now we will show you what submitting files to Github will be like using Git!
Open the file magic_word.txt in whatever your favorite text editor is. Edit your magic_word.txt file to
contain the magic word obtained during the git exercise.
Remember that you will need to get your git exercise checked off by a staff member or academic intern. Your lab TA will tell you how to queue for help. It may be using a a whiteboard queue (for in-person labs), the online OH queue (for in-person and online labs), or a Discord queue (for online labs). Please ask your lab TA if you are unsure what queue they are using. As an alternative to in-person or online checkoff, please use the asynchronous checkoff form on beacon to get checked off if you are comfortable with the material.
Now stage and commit magic_word.txt (make sure you’re in your repo!).
git add lab01/magic_word.txt
git commit -m "Added Magic Word"
Let’s also make sure that we’re working with the branch name we expect,
main. Sometimes, git just decides to use master, which we don’t want, and
we’re not really sure why, so let’s make sure by running this command:
git branch -M main
Finally, push these changes to the main branch on the origin remote repo.
git push origin main
Note if your default branch is master, we recommend changing it to main by
asking your lab TA, though you can also replace main with master and execute
the above.
You can verify that this was successful by checking your repository online on
Github’s website. It should contain the updated magic_word.txt file. We’ll cover submitting to gradescope (where the autograder lives, and where we’ll grade your submission) later in the lab.
Programming Exercise: Collatz #
Open the file called Collatz.java. Try running it and you’ll see the number 5 get printed.
This program is supposed to print the Collatz sequence starting from a given number. The Collatz sequence is defined as follows:
If $n$ is even, the next number is $n/2$. If $n$ is odd, the next number is $3n + 1$. If $n$ is 1, the sequence is over.
For example, suppose we start with $5$. Since $5$ is odd, the next number is $3 \times 5 + 1 = 16$. Since $16$ is even, the next number is $8$. Since $8$ is even, the next number is $4$. Since $4$ is even the next number is $2$. Since 2 is even, the next number is $1$. At that point we’re done. The sequence was $5, 16, 8, 4, 2, 1$.
Your first task is to write a method as follows: public static int
nextNumber(int n) that returns the next number. For example nextNumber(5) should return 16. This method will be tested by the Gradescope autograder. Make sure to provide a description of the method as a comment. Your description should be contained by /** and */. Comments contained by /** and */ are also called “Javadoc comments” or just “Javadocs”. These comments can span multiple lines if they need the extra space, e.g. the nextNumber Javadocs.
Javadocs may contain optional tags, e.g. @param. We do not require you to use any tags like this in 61B except the @source tag. Use the @source tag any time you receive significant help on a project. The @source tag is not required for HW or lab, though we recommend it anyway, since it’s a good scholarly and professional habit to cite your sources.
Some quick Java tips:
- The
&&operator computes the booleanandof two expressions, while||computes booleanor. - The
%operator implements remainder. For example, the value ofx % 4will be0,1,2, or3. - The
==and!=operators compare two values for inequality. The code fragmentif (n % 4 == 1)reads as “if the remainder when dividing n by 4 is equal to 1.”
After writing nextNumber, run the main method so that it prints out the Collatz sequence starting from n = 5. For example, if n = 5, your program should print 5 16 8 4 2 1. It’s fine if there’s an extra space after the 1.
Fun fact: For all numbers, the Collatz sequence appears to terminate at 1. So far, however, nobody has been able to prove that this is true for all possible starting values, but all values up to approximately 2^68 have been checked. As noted in the wikipedia article, mathematician Jeffrey Lagarias noted that the Collatz conjecture “is an extraordinarily difficult problem, completely out of reach of present day mathematics.”
General Git Workflow: Saving Your Work and Submission #
Submission #
The last step is to submit your work with Gradescope. Gradescope is the site that you’ll use to submit lab and project assignments.
We added everyone’s CalCentral email to Gradescope on the first day of labs. Make sure to login using the email address listed on CalCentral.
If you’re having trouble accessing your Gradescope account or would like to use a different email address, ask your TA!
To submit the assignment, follow the steps below. These steps are for every assignment.
-
Add your lab using
git add. In other words, run the following command:git add lab01or to add all files, use
git add . -
Commit your lab using
git commit -m "<commit message here>". As an example:git commit -m "finished Lab01" - Push your code to your remote repository, i.e run
git push origin main. - Open the assignment on gradescope, select Github then your
fa22-s***repository and themainbranch, and upload the assignment.
Gradescope will use the latest version of your code as seen on Github. If you have any questions regarding this process please ask your TA and they will be more than happy to help you out!
As above, we strongly encourage you to make frequent commits! Lack of proper version control will not be considered an excuse for lost work, particularly after the first week.
Saving Your Work using Git and Github #
As you are making changes to your code, it is good practice to save your work often. We have briefly discussed the commands, but now we will explain how they should be used in practice. In the case that you ever want to go back to another version of your code, it is better to have more options to roll back to. The next set of instructions will talk you through Git’s version of saving work through snapshots of your file system called commits.
-
After you have made some changes to the code within our local repository, Git will take notice of these changes. To get a report of the current state of your local repository use the command
git status. Run this and try to interpret the results. Do they make sense to you or do they match your intuition? It is helpful to run this before running other git commands so you know what the state of things are. -
If we want to save work that we have completed on a file, we must first stage the file and then we can commit it. Staging a file is achieved with the command
git add; this does not save the file but it marks it to be saved the next time you commit. The two below commands show what saving work looks like in a git repository. Forgit adddepending on what directory you are in, the path to the file you are adding might differ (hint: usegit statusif it’s not clear). Additionally the-m "Completed Collatz.java"part of the commit command specifies a message to be attached to this snapshot. It is useful to have descriptive messages in case you ever do need to revert to a previous version. As an example workflow:git add lab01/Collatz.java git add lab01/magic_word.txt git commit -m "lab01: Completed Collatz.java and added Magic Word" -
Once again, we want to push these changes to the Github repository so that your changes can be seen by us and graded. Your changes will also be available to
pullif you had your repo initialized in other places or other computers.git push origin main
Get into the habit of saving your files and doing the git commit step often
(i.e. every 15 minutes). It will be incredibly helpful when you mess things up, since
it allows you to back out of changes and to see what you have changed recently.
Basically, right when you sit down to work in your repository, first git pull
to make sure you are starting with the most recent code. While you are working,
frequently commit. When you are finished, git push so all your changes are
uploaded and ready for you to pull again next time.
Recap #
Java is a compiled language. You can use javac and java to compile and
run your code. Our first programs reveal several important syntax features of
Java:
- All code lives inside a class.
- The code that is executed is inside a function, a.k.a. method, called
main. - Curly braces are used to denote the beginning and end of a section of code, e.g. a class or method declaration.
- Statements end with semi-colons.
- Variables have declared types, also called their “static type”.
- Variables must be declared before use.
- Functions must have a return type. If a function does not return anything, we use void,
- The compiler ensures type consistency. If types are inconsistent, the program will not compile.
Java is also statically-typed. Static typing gives us a number of important advantages over languages without static typing:
- Types are checked before the program is even run, allowing developers to catch type errors with ease.
- If you write a program and distribute the compiled version, it is (mostly) guaranteed to be free of any type errors. This makes your code more reliable.
- Every variable, parameter, and function has a declared type, making it easier for a programmer to understand and reason about code.
There are downside of static typing, to be discussed later.
We also discussed briefly how to comment code and coding style. Coding style is very important in this course and in the real world. Code should be appropriately commented as described in the textbook and lectures. We haven’t learned what good style is yet, nor when to use comments.
Git is a version control system that tracks the history of a set of files
in the form of commits. Commit often and use informative commit messages so
it’s easy for the future-you to find what the change you’re looking for. Pull
from the skeleton remote repository to get or update starter code for
assignments and use Gradescope to submit labs and projects.
Optional: Josh Hug’s Color Scheme IntelliJ Download #
Per Josh Hug: “I’m not a big fan of the default IntelliJ colors, so I made my own color scheme, which is a very close imitation of the extremely good Sunburst theme for Sublime. To use my theme, download hug_sunburst, and import it using the “File→Manage IDE Settings→Import Settings” option in IntelliJ. You might end up with large text, which I use for recording videos. To adjust the size of the font in Intellij to your liking, see this link.”
Deliverables #
As a reminder, this assignment has an FAQ page.
There are three required files, all inside the lab01 directory:
LeapYear.java- No need to make any changes to this file. Just use this file to make sure your IntelliJ setup matches the screenshots in the spec.
magic_word.txt- You should have received the correct magic word from completing the git checkoff. If the lab section is about to end and you have not been checked off manually yet, please come to office hours or use the asynchronous checkoff form on beacon!
Collatz.java- You should have completed the
public static int nextNumber(int n)method in this file. We will be running an autograder to check for this!
Be sure to submit all of these files according to the submission section Congratulations on finishing your first CS 61B lab!